Saturday, 25 June 2011

War of Spanish Succession- Marshalls of France II update

With the coat and saddlery completed I worked on cleaning the slops by going back over with white primer, not something I usually do but I'm finding myself becoming a little fussier and it does make life easier down the track.


I decided to to undercoat the gold portions of the figure with a buff tone, to see how that works, making sure it went into the depressions and no white was left behind.

Photobucket

Photobucket

First touches with the gold paint and a small amount of washing, immediately it was clear the base coat should have been a little darker although the idea of using a base coat for the gold was the right thing to do.

Photobucket

Glints have been picked out in a mix of pearl white and polished gold and picked out to add very small points of light (loop of cuff lace, button. button lace on coat).  They certainly make taking photo's a glarey business!

Photobucket

Photobucket


Couple more to wrap up, hair has moved along and some more mid tone has been added to the gold

Thanks for looking
Dave

Thursday, 23 June 2011

War of Spanish Succession- Marshals of France II

Work has slowed a bit on Monsieur Villars as some GW night goblins have fronted for a commission job (more on that next week). Work has progressed however and the main elements are starting to take shape. This time I have found a charming oil on canvas to work from with our man leading the storming of the works at Dedain, the uniform will be modelled on the outfit Villars is wearing in this painting.


Once again I'm using the new set of reaper paints and trying to get a feel for the different shades of red, working on one that I like and I think will work with the shading and high lighting.


Once relatively happy with my pallet of red and blues I have started work on the coat, saddle cloth and pistol covers. Not great photos I'm afraid, the tend to be a bit hit and miss.


Don't forget when browsing to click on the pic's for big-ness

I was not totally happy with the shade of read and have gone back to an old favourite and have given the coat a glaze or two of Humbrol acrylic red (the old one), shading was achieved by adding a little mid blue to the red and high lights by adding a very small quantity of pale yellow.


The palette so far, the base coat red is not shown the red here is the old style Humbrol acrylic red used to glaze the coat, the orange is the final highlight tone, small amounts of yellow was added in stages and applied to the coat. The shades of violet are the base coat blue mixed with red and used to shade the red coat and blue horse blanket and pistol covers this keeps the range tight and the colours relative to one another. Light blue is mixed in stages with the base coat blue for  blue mid tones and high lights. Did that make sense?

For your interest and just for a laugh here are the brushes I have been using for these French Marshall figures.  Both would have been purchased back in 99 to 01 for princely sums of $2 to $3 from the local news agent! Does anyone remember Premier Art equipment? I think the synthetic is starting to hook at the tip so it wont be long before it joins the utility brushes.


The paint on the handle has flaked and chipped off years ago


Poor old thing, the tip is starting to hook, not much paint accumulation in the ferrel, so it has been kept relatively clean.

Of course back in those days I didn't know what kolinsky sable was, I just bought the brushes with the tips I wanted, didn't understand the black'un was quality, well news agent quality!

Regards
Dave

Sunday, 19 June 2011

NMM paint selection- gold

A short post to answer a few questions regarding paints and Steve's query on dark bay 'orses.


These are the colours used for the gold lace and the metal horse furniture, Reaper is a new brand for me and the first time I have used them. I wont go into the process too much you can get a general idea from the photos, Chestnut gold was the base colour with the rest following in the progression as shown, the golden yellow was toned down just a little with the lemon yellow. All the paints were mixed down with water at about 1:1 each was applied sparingly with multiple brush strokes. The orange brown was mixed to a glaze and use to add tone so about 4 parts water to 1 part paint. I'm quite sure I have equivalents in my other paints, a mix of GW/Citadel and Vallejo, although the palomino gold is one of those must have colours no matter what brand you use, very versatile.

click to see the brass bit, stirrup and spurs


 For the brass fittings I just made up a quick combination of a base of chestnut gold with palomino gold mid tone and lemon yellow high lights, it will do until I can find something better.
I should also add that I used a wet pallet while painting this which allows easy blending of paint so the colour used may be tinted with another


The black/brown horsie is pretty quick to achieve Steve the wargamer, first I should say that the undercoat is grey car primer, I don't know if has much affect on the finished colour but just in case it does.

OK two washes of dark brown to start, in this case I used Reaper blackened brown (if you look at the saddle area you can see the finished colour for this section of the guide), now any shading you would like to give to the horse give another two washes with the blackened brown, an example would be under the belly inside the legs etc, Front Rank horses have remarkably little muscle detail so you wont spend long on this phase picking out the muscle shading, a bit on the rear flank and the legs.


OK choose your brown, for this horse I used chestnut, and ever so lightly pick out the muscle definition *snort* and high lights with a dry brushing, it is important you don't go too heavy on the dry brushing just get that tint of brown. When your finished with the dry brushing coat the horse with a light wash of black and then repeat the process, drybrush again at the very highest points and wash again and that is it. If you want the horse darker then finish with two light washes of black. Always make sure the wash is properly dry before you start the next step, a hair dryer fixes that. This horse took all of 5 minutes and I'm a notoriously slow painter. I hope that made sense guys a

Saturday, 18 June 2011

Fitting Tallard to his mount, just pics

Quick peak as I'm moving on to Villars now, what was Front Rank thinking four French gentlemen soldiers and not a goatee or a moustache between them! Zacreeee Bloooooo!


Remember click pics for bigness.

regards
Dave

Friday, 17 June 2011

War of Spanish Succession- Marshals of France update NMM completed

A few update photo's for your perusal. After adjusting the tones more than once the gold lace work is completed. I cant do much more simply because I am very definitely at the end my knowledge of the nmm technique, most of it works and I have certainly tried enough combinations of brush strokes and colour choices to fry my comprehension lobes, so put the brushes down Paint Pig.


The face and cuffs were painted in while I was between 'nmm' ponders and the hair was painted over to hide the slop from the flesh work, there was surprisingly little considering the space available.


Tricorne has been blacked in although the cockade and feather trim awaits colour clarification.


The simple white Marshals sash is complete, I made sure to avoid having too deep a grey base tone in the shaded areas to reflect good quality silk.


When compared to a similar photo below from the previous post you will see the changes I made to the gold trim on the saddle clothe, I cant say that it is any better, just different.


Face is done as much as I'm going to do it, I spent far too much time on it trying to get the shading from the tricorne and arm right and.... I just spent too much time on it! I might tweak the red a bit with some more contrast as far as the cuffs go but they are pretty much done as are the pistols.

I'm using Reaper paints for this miniature, a new job lot I picked up at the beginning of the year, and this is the first time they have seen some action so it has been a chore sorting through them to identify colours but they work OK, as soon as I can I'll make out a list for the colours re the nmm.

regards
Dave

Thursday, 16 June 2011

Wednesday, 15 June 2011

War of Spanish Succession- Marshals of France

Only two Marshals to start with Monsieur's Tallard and Villars according to Front Rank, although you could call the figures anyone you like I guess depending on the paint scheme you choose, but for the sake of clarity if nothing else we shall call them as described in the cattle dog.

The horses first as they are nearest to completion (but furtherest from being finished), the strapping and eyes will be completed once I have the rider finished and duly mounted


The horse above did start out being as a deep chestnut but some where along the way morphed into a golden chestnut in colour which still looks pleasing.  This will be Tallards mount, when ordering the figures I notice that the figure although saluting with his bowed head would look equally at home holding his tricorne as the horse broke into a canter, that my hope.


Here we have Marshall Villars feisty steed which I think (hope) will go well with the figure waving his tricorne. This horse turned out exactly as planned, black with a hint deep brown, a colour I quite often see and thought would replicate. I don't know if this colour has a particular name. Both horses have been varnished to keep the safe from any 'more' damage and repairs, I'm a bit of a butter fingers some days!

Our worthy French Generals........

Monsieur Tallard which I have about half, maybe a bit more, completed with the blue of the coat and saddle clothe shaded and detailed.


Once the blue tones were completed I went back over the figure with the under coat and black wash to clean up any sloppiness before moving on to the crimson and yellow


The recess between the arm and face is a bit of a pain to get to, the photo does not show us anything but believe me it is all going on in there and will have to be painted,  it is easily seen with the naked eye. Nice detail on the face

Haven't made up my mind whether to use a painted finish for the gold trim or metallic paints though I am leaning towards metallic paint as true gold thread was used on the lace of very senior (wealthy) officers rather than gold coloured materials.


Monsieur Villar which I have done practically nothing to, but I thought you might like to see the sculpt.


The figure is about roughly the same angle as it will be on the rearing horse, looks cheery enough. He has a very nice plain uniform, I will have a look through my library and find out which regiment he was colonel of and maybe use that for the coat colour or maybe the french pearl white/grey coat colour, that would make for something different?


Once again it is a nice sculpt and should turn out well and don't forget to click on the pictures to enlarge them.

For those of you wondering why I'm being so pedantic about this and that with these figures they are being painted for sale on the inter web, here first and if I don't get any enquiries then ebay. The hope being I might build up some reputation for painting something more than table top quality miniatures adding some specialty pieces to my repertoire, of course I might just be day dreaming, you can but try. There is no misplaced sense of ego, these are not true display quality figures, but I would like to think they will turn out a cut above my normal output, if only my photos would stop turning out randomly grainy

regards
Dave

STOP PRESS I took a few more photos which have come out much better, not so grainy, with a good view of the face and a tentative attempt at giving the coat lace a painted gold finish (NMM), just for a look-see. Click on the pictures to enlarge


Much better indication of the blends and shading of the blue coat and a reasonable view of the lace work. I may do the other side with gold metallic paint to compare, what do you think?

regards
dave

Tuesday, 14 June 2011

Ye olde update- last hoora, gripping beast

Finally my quarter year wrap is completed.

Besides mucking around with that warhammer stuff I managed to get a start on more crusader types, once again from the beast that grips however I notice that they don't seem to be in the cattle dog, well not these exact versions anyhow. They must be well old, it is about time they got a lick of paint (5minutes Mr Fawlty), if anyone would care to give me a more precise description of the figures other than crusader types I would be grateful.


They all seemed to be armed with spears (not glued on yet) which I guess is OK seeing as they have their swords sheathed.


I think maybe that I will leave the shields until I can work out which nationality I want them to represent, I'm leaning towards Italian at the moment although I have no idea what shield designs would be popular with this choice?


Those cloaks were a bit of a pain, they are not very well sculpted (click on the pic to enlarge) and could have done with a bit more trimming and filing by me, there's some pewter in these three fig's the cloak is nearly 10mm thick at the base! Should get a bit more work done on these and update them soon.

regards
Dave

Saturday, 11 June 2011

Ye olde update- OMG mk II! more money hammer ...goblins now!

What else have I been doing over the last three months..........

Well I had a commission to paint a small quantity of night goblins (I didn't even know they came in UV and non UV tolerant varieties) last month and after visiting the web sight of the manufacturer, duly applied the appropriate paint shades in the required places (I did sneak in some variation while I wasn't looking) as requested. The chap seemed happy enough that the colour scheme had been faithfully followed and the transaction was concluded.


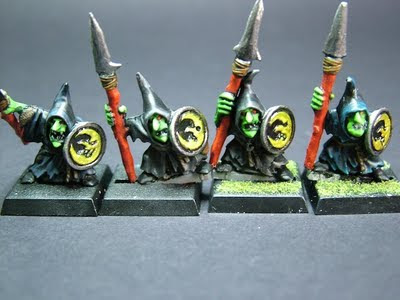
Unfortunately this is the only photo of the UV intolerant goblins I have that is of any use, not finished but on the way, I really should have pulled my finger out and kept a proper record, maybe I might be able to fix up the blurry photos with photshop. I sneaked a bit of blue-ish highlighting and shading on the odd figure. Twenty more are due this month so he obviously was happy with the work.

After painting the Night Goblins above and the Dwarves mentioned previously my interest was piqued and, keeping my eye on the ebay, I managed to pick up something of a huge job lot of GW's War Hammer wotzit's, even my mediocre maths skills have determined $150 has bought a small fortune worth of WH models when new. I'm now the proud owner of Goblins (UV tolerant), Goblins (not UV tolerant), Orcs, more Dwarves, Lizards and some 40K thingies with a hover do-hicky. Some painted, badly, many more not painted at all and a good fraction still on sprues!  What am I going to do with it all you ask, paint it and sell it for the most part although the metal figures, dwarves and unusual or charming pieces I'll keep... for now.


So far I've been mucking around with a couple of goblins and different paint effects and colour schemes.


Playing around with the colour scheme,  'A' coy of the Royal Paint Pig Blue Moon Battalion!


Trying out some metallic colour and highlighting on the shields, proud blue moon crest


The spearman has slightly paler skin than the officer or standard bearer or whatever it is, I will probably go even paler green on the skin seeing they don't spend much time in the sun getting a healthy green tan.


More mucking about blending the shade and highlights with coloured metallics, all hail the Royal Paint Pig Blue Mooners. I should spend a bit more time on these this weekend and post the finished item next week, hopefully with a bit less glare in the pic's

It is just as well that there was too much for me to explore in historical gaming over the last 30 years, if fantasy had beckoned I would either have had a very poor WH army, or a very poor wife, probably both.


regards
Dave